
Old iPhones used to come with 64GB, 128GB, or a max of 256GB storage space that is not sufficient enough to store our everyday selfies. The HDR camera captures every image of around 8MB and the video size also goes high. This can make you run out of storage space on your iPhone. You will need to transfer files and transfer all photos from your iPhone to some external storage.
There are various ways to perform data transfer from iPhone to a PC or an external storage drive. If you have additional iCloud space, you can transfer your favorite and important pictures on iCloud space. The rest of the data transfer can be done on an external hard drive or a PC. Here are the tips and tricks to securely transfer files from iPhones to external storage devices.
Also Read: How to transfer WhatsApp chat from iPhone to Android smartphone
Transfer Photos from iPhone to iCloud
Transfer all your important and favorite photos to iCloud so that you can access them frequently from any Apple device.
Step 1. Connect your iPhone to a Wi-Fi network.
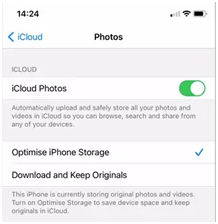
Step 2. Check your iCloud space and figure out how much data it can accommodate. Go to “Settings” on your iPhone, tap on your Apple ID on the top, select “iCloud” and tap on the “Manage Storage” option.
Step 3. Go to “Settings” and tap on your Apple ID. Select “iCloud,” and tap on “Photos.” Tap to toggle ON the “iCloud Photos” option. Let it upload all the photos onto iCloud.
Step 4. It will automatically upload all the new photos you take on the iCloud storage.
Step 5. If you wish to upload selected photos to iCloud manually, you can start the transfer from Photos App on your iPhone. Access the “Photos” app on your iPhone.
Step 6. Select the photos you wish to transfer by tapping on the “Select” button on the top right.
Step 7. Tap on each photo you want to upload to iCloud.
Step 8. Tap on the share button at the bottom left and select the “Upload to iCloud Photos” option. All the selected photos will be uploaded to iCloud.
Transfer Photos from iPhone to PC
Step 1. Connect your iPhone to a Windows PC using a USB cable.
Step 2. You will see a prompt on your iPhone asking for permission to allow Windows PC to access photos and videos of your iPhone. Tap on the “Allow” option to grant permission.
Step 3. Press (Win + E) to access Windows Explorer on your PC.
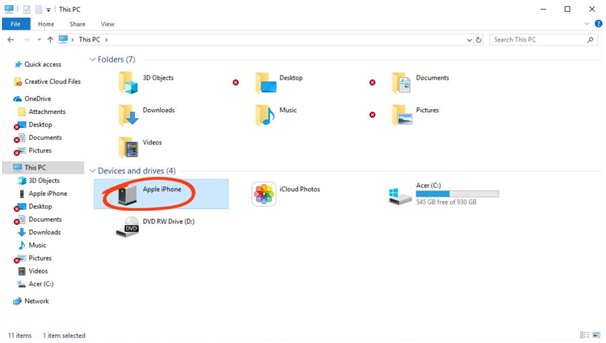
Step 4. You will be able to find your iPhone listed under “This PC” in the left-hand side panel. Click on iPhone to access your iPhone’s internal storage.
Step 5. Open the “Internal Storage” or “DCIM” folder of your iPhone.
Step 6. Access Copy and Paste the entire DCIM folder on your PC’s Storage.
Also Read: How to fast charge your iPhone without buying extra Apple product
Transfer Photos from iPhone to Mac
If you want to transfer all photos from your iPhone to a Mac, it is easy with these steps.
Step 1. Connect your iPhone to your Mac using a USB cable.
Step 2. If it prompts for permission, tap on the “Allow” option to grant permission.
Step 3. The Photos app will automatically open on your Mac. If it fails to pop up, you can manually open it on your Mac.
Step 4. Look for the iPhone listed in the sidebar under “Devices” in the Photos app. Click on it to access your iPhone’s photos.
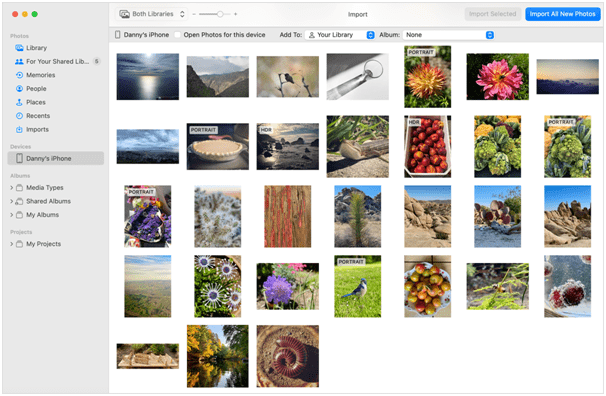
Step 5. Select the photos you want to transfer by clicking on them. Or if you wish to transfer all photos from your iPhone to your Mac storage, you can select all of them.
Step 6. Click on the “Import Selected” or “Import All New Items” button at the top right corner of the Photos app.
Step 7. Select the destination folder where you wish to import all the photos.
Step 8. Click on the “Import” button to transfer the selected or all photos from your iPhone to your Mac.
Transfer Photos from iPhone to External Storage
If you wish to transfer photos from your iPhone to an external hard drive, you will need a PC or Mac to connect the external hard drive as you can’t connect the external hard drive directly to your iPhone.
Step 1. Connect your external hard drive to your PC or Mac.
Step 2. Use another USB cable to connect your iPhone to the same PC. If there is only one port, use the above methods to first transfer your photos from iPhone to PC or Mac. Then connect the external hard drive to move your photos to the external hard drive.
Step 3. Access your iPhone in Windows Explorer. Go to the DCIM folder and copy all the photos from there.
Step 4. Paste all the photos from your iPhone to the external hard drive or PC storage. You can back up all your memories by performing the above steps of data transfer.
Final Words
This article on how to transfer photos from an iPhone to an external hard drive has the best manual tips and tricks to transfer files and free up your iPhone storage. you can perform data transfer, manage storage, or erase all your photos from your iPhone once you transfer all photos from your iPhone to backup storage of course after choosing an ideal backup solution for your iPhone. Never miss any memory to free up space, just move it to an external backup!
You might also like our TUTEZONE section which contains exclusive tutorials on making your life simpler by using technology.