
Yesterday, the Uber added a new feature which will allow the users in India to add multiple stops to their trip. It will be useful for those of you want to pick up and drop off several friends during anytime in your ride. It is available already in many countries.
You will be able to add up to 3 stops in India and your final fare would include distance and time rates on trips with extra stops. Those stops which you add during a trip will right away update the driver’s route as well. After reaching any of the added destination, you will have to swipe ‘confirm stop’ to continue your route to the next location.
Also read: Uber completes 500 million trips in the Incredible India
It might sound confusing to you, that’s why here in this post, we’re going to guide you on how to add multiple stops on or before a Uber ride.
How to add multiple stops in Uber?
- Launch the Uber app and tap on “Where To” box.
- Tap on the ‘+’ which is to the right side of the box.
- Tap “Add a Stop” to include your first destination. You can do this at any point, before or during your ride.
- Tap “Add a Stop” again if you want to add more stops.
(Note: You must note that you’ll be able to add only 3 extra posts). - Finally tap on “Save”.
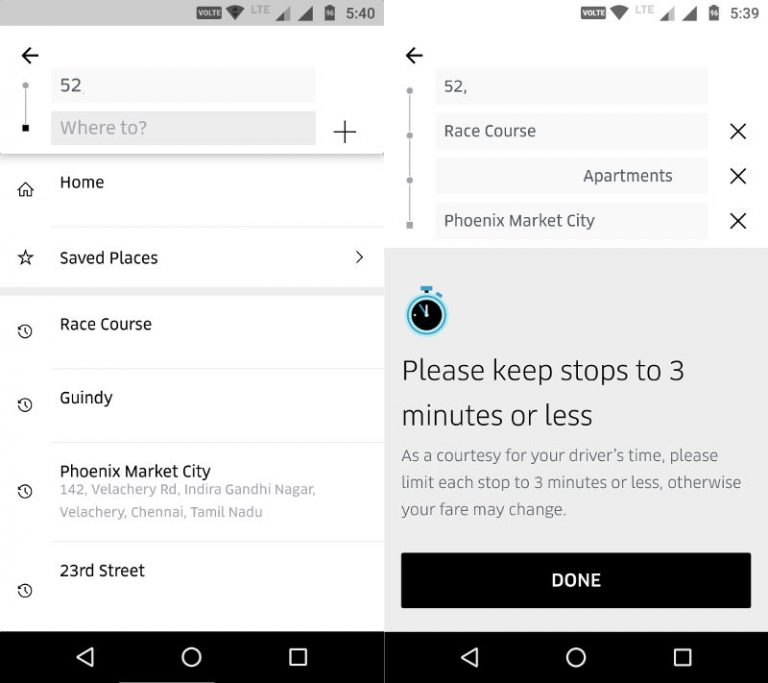
According to Uber, each stop that you add should be under 3 minutes. If not, the fare might increase depending on the time you spend for waiting. Share us your views on this new feature of the Uber app in the comments section below.
Don’t miss: How to book the Ola or Uber cab from the Google Maps app?
For more tutorials, visit our TUTEZONE section that contains exclusive articles on how you can improve your life using technology.
FEATURED IMAGE: PHOTO BY STUDIOEAST/GETTY IMAGES/GETTY IMAGES